

Auth0 recommends using normal, out-of-the-box federated login whenever possible. By allowing you to set the user for the transaction, Custom Token Exchange gives you more flexibility by taking on the additional responsibility of securely validating and handling the transaction.
Use cases
This section describes example use cases and specific code samples with recommendations for implementing your scenario. To illustrate the use cases, we will use GearUp, a fictional car rental service company.Use Case: Seamless migration into Auth0
GearUp has a mobile App used by millions of people and needs to modernize their Identity solution so they’ve decided to switch to Auth0. However, they want to avoid forcing users to re-authenticate as they migrate from their legacy identity provider, or IdP, as that adds friction to the user experience. To solve this, and to limit risks, GearUp is migrating incrementally. For each user, they wish to exchange the refresh token from their legacy IdP for an Auth0 access token, refresh token and set. This allows their app to seamlessly start using Auth0 as the IdP for this user, as well as consume GearUp APIs using Auth0-issued tokens. Once the exchange is done for all users, the app will be fully migrated and the old IdP can be disconnected–all without impacting end users and GearUp’s business.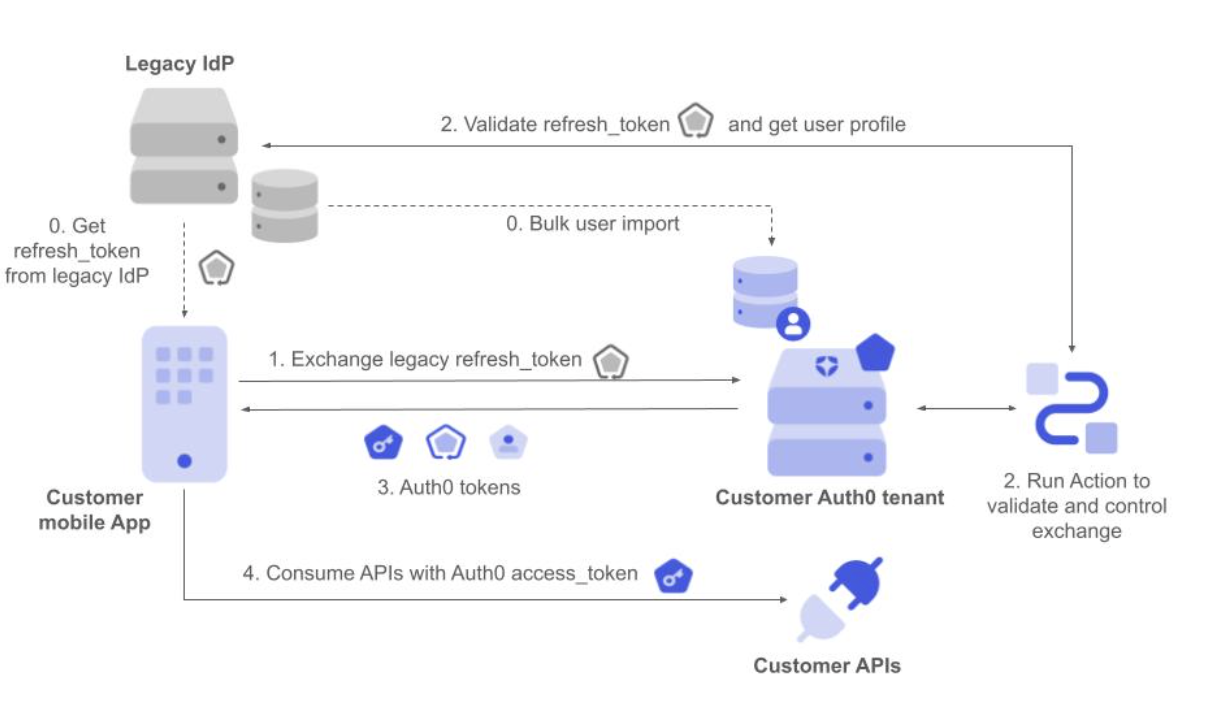
- The mobile app makes a request to Auth0 to exchange the legacy refresh token, setting it as the subject token.
- The corresponding Custom Token Exchange profile Action executes. It validates the refresh token with the legacy IdP and gets the external user ID from the user profile. It then applies the required authorization policy and finally sets the user.
- Auth0 responds with Auth0 access token, ID token, and refresh token.
- The mobile app can now use the Customer APIs using Auth0 tokens without the user having to re-authenticate.
- We don’t want to create the user.
- We don’t want to update the user profile.
Use Case: Re-use an external authentication provider
Another use case involves GearUp partnering with Air0, a leading travel provider, to offer their car rental services directly within the Air0 single-page application. GearUp offers a JavaScript library that encapsulates the use of their APIs. This way GearUp’s APIs can easily be consumed by Air0’s website where car rental services are being offered. Once again, the solution needs to be invisible to end users by avoiding re-authentication to GearUp. To solve this problem, GearUp’s JavaScript library can perform a token exchange using the external Air0 ID token as the input. This results in an Auth0 access token that is generated and associated with the corresponding GearUp user based on their email address. Once the GearUp library gets the access token, it can start using GearUp’s APIs to offer car rental services directly within Air0’s website.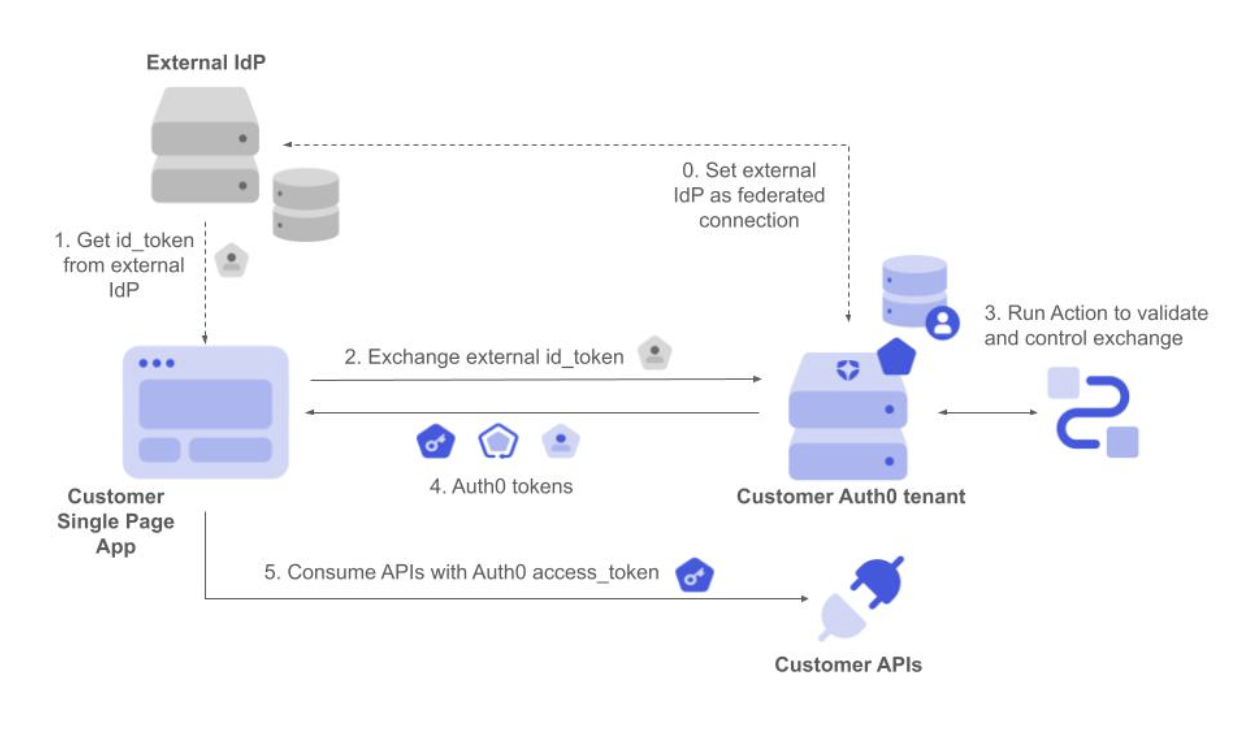
- The Single Page App gets the ID token from the external IdP once the user authenticates.
- It then requests the exchanges of the ID token, setting it as the subject token.
- The corresponding Custom Token Exchange profile Action executes. It validates the ID token and gets the user ID and other profile attributes from the token. It then applies the required authorization policy and finally sets the user.
- Auth0 responds with Auth0 access token, ID token and refresh token.
- The javascript code running in the SPA can now use the Customer APIs using Auth0 tokens without the user having to re-authenticate.
- We use the external IdP user ID to set the user in the corresponding connection.
- We want to create the user if they don’t yet exist.
- We don’t want to replace the user profile if a more complete set of attributes is obtained via federated login, in case the user already exists.
- We don’t want to verify emails when users are created.
Use Case: Get Auth0 tokens for another audience
GearUp wants to improve how it authorizes calls between its internal microservices to serve API requests. It wants a centralized policy controlling the resources that each service can consume. This can also be solved using Token Exchange. When the API request first arrives at service A, it exchanges the received access token for a new one that allows it to consume service B as the new audience. If the authorization policy governing the token exchange allows it, service A gets the new token back and can now consume service B. The user ID is kept unchanged in the new token, so the proper user context is retained throughout the process.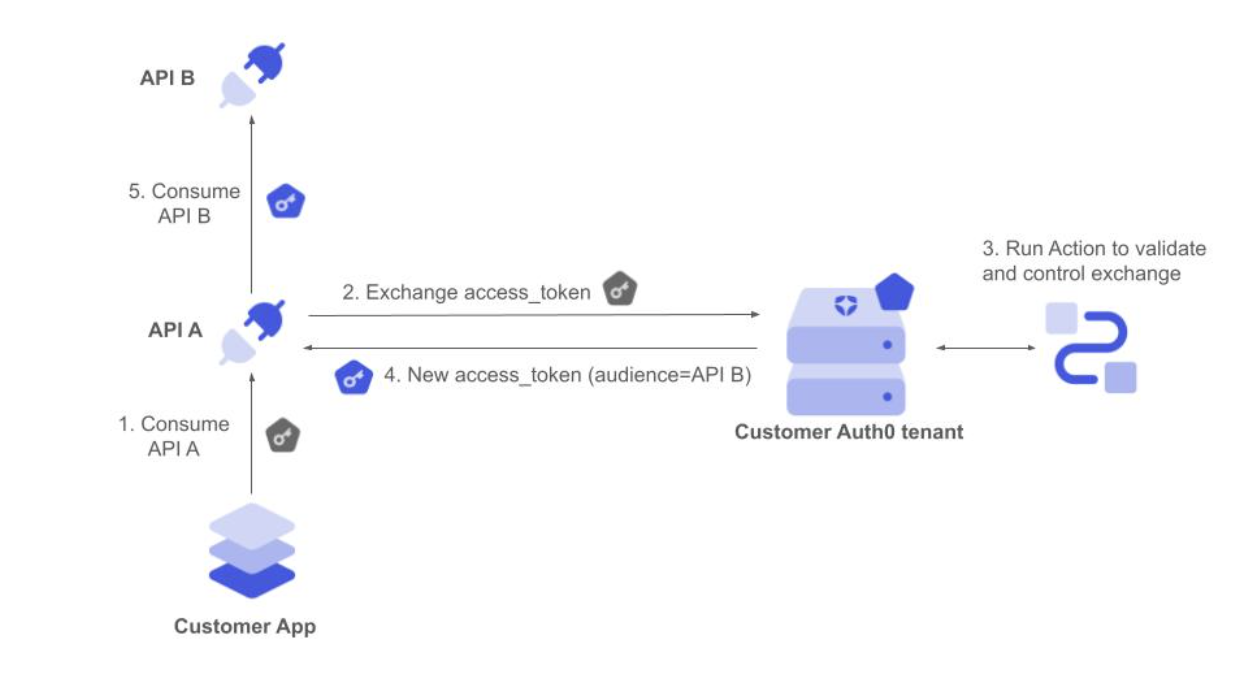
- The app sends the request with the initial access token to API A.
- API A backend service validates the access token and requests to exchange by setting it as the subject token for a new access token to consume API B.
- The corresponding Custom Token Exchange profile Action executes. It validates the access token and gets the Auth0 user ID from the token. It then applies the required authorization policy and finally sets the user.
- Auth0 responds with an Auth0 access token to consume the API B audience.
- API A backend service calls API B using the new access token, which is still associated with the same user.
- We use the Auth0 user ID to set the user, so there is no need to set this in the scope of any connection.
- We don’t want to create or update the user.
Use case: Perform MFA during Custom Token Exchange
Building upon the Use Case: Re-use an external authentication provider, GearUp now wants to confirm user presence when a token from the external authentication provider is used. This is necessary to mitigate security risks such as token theft or scenarios where MFA is not supported by the external authenticator. GearUp has two options to achieve this: implement an organization-wide MFA policy or programmatically trigger MFA using a Post Login Action. The next example uses a PostLogin Action to trigger MFA authentication during the Custom Token Exchange transaction. For more details on using MFA grant over embedded APIs, please see the documentation for using ROPG with MFA, as Custom Token Exchange follows the same model. First, define the Action, usingapi.multifactor.enable() to trigger an MFA challenge. This function is described in Post Login API documentation.
mfa_required error that returns an MFA token:
mfa_token that is returned, the application can then call the MFA API to challenge and verify a factor:
First, return a list of authenticators:
mfa_token and oob_code (if returned) to complete the verification process using the token endpoint and receive tokens:
Use Case: Support agent acting on behalf of an end user via API
GearUp’s support agents need to access end-user data and perform actions via GearUp’s backend APIs on behalf of the end-user. The support tool authenticates the agent, then uses the Custom Token Exchange to obtain an access token representing the end-user with the agent tracked as the actor.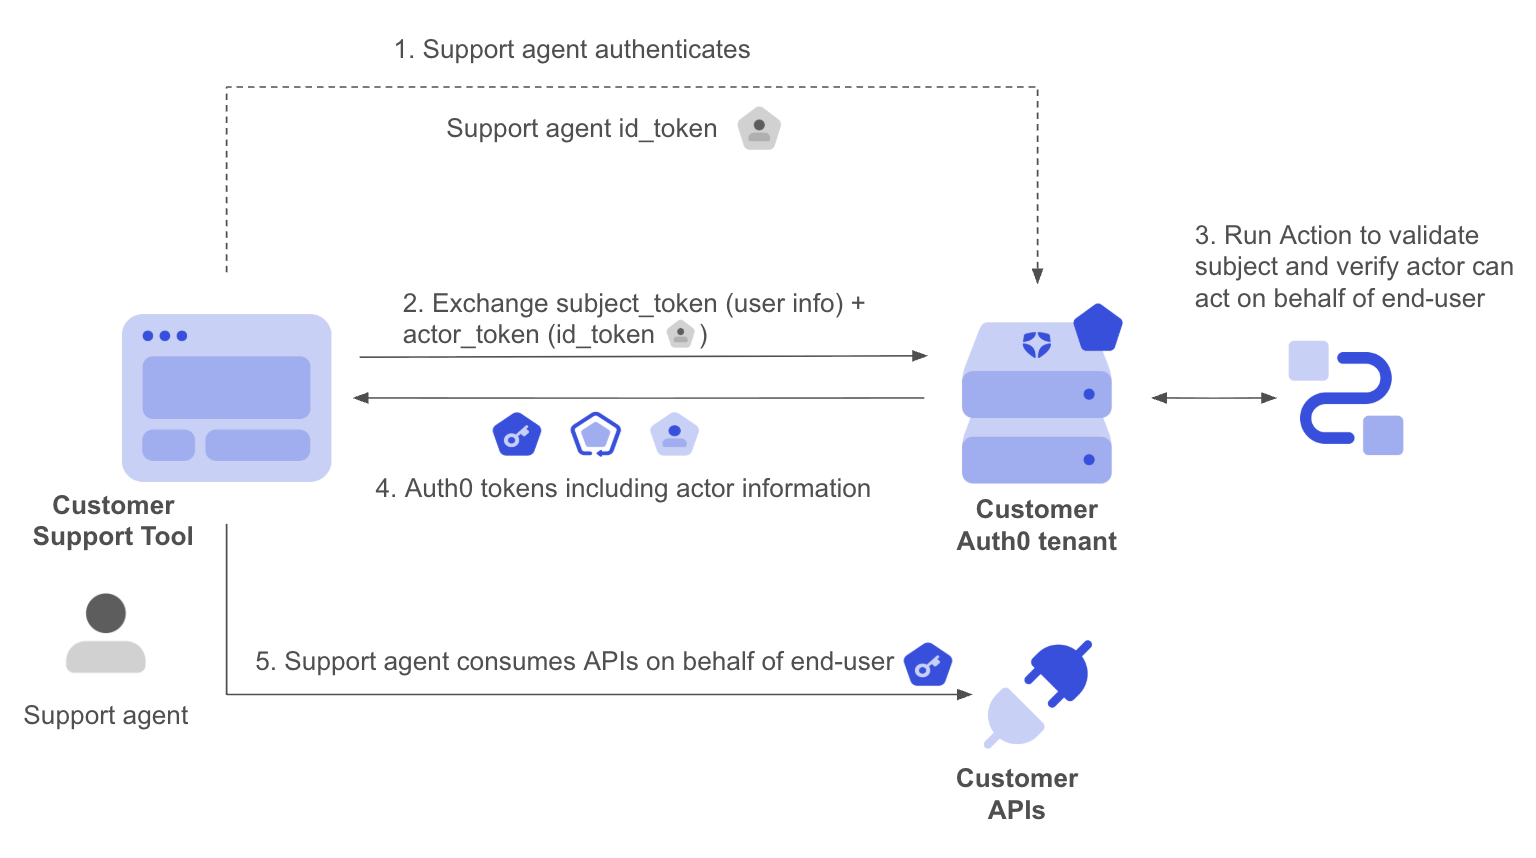
actor_token in the request, and a signed JWT identifying the end user is sent as the subject_token. When actor_token_type is set to urn:ietf:params:oauth:token-type:id_token, Auth0 automatically validates the token (signature, expiry, issuer) and populates event.transaction.actor_token_user with the agent’s profile. This eliminates the need for custom validation code for the actor token.
Using an Auth0 ID token as the
actor_token is not mandatory. When actor_token_type is a custom value, the Action must validate the actor token via custom code, similar to how subject tokens are validated. The automatic population of event.transaction.actor_token_user only applies to Auth0 ID tokens.- The support tool authenticates the agent with Auth0 and obtains the agent’s ID token.
- The support tool calls Auth0’s
/oauth/tokenusing a Custom Token Exchange request, including a signed JWT with the end-user’s identifier assubject_tokenand the agent’s ID token asactor_token. - The Custom Token Exchange Action validates the subject token, verifies the actor has the right to act on behalf of the end user, and calls
api.authentication.setActor(). - Auth0 issues tokens with the
actclaim identifying the support agent. - The support agent consumes the API on behalf of the end user. APIs can inspect the
actclaim to apply authorization policies specific to delegated access, such as restricting write operations or logging activity for audit purposes.
act claim:
Important considerations for delegated authorization
When implementing delegated authorization with Custom Token Exchange, follow these guidelines:- Implement authorization logic within your Custom Token Exchange Action to verify that the actor is authorized to access the specific user account. For example, you may wish to implement authorization decisions that only specific actors are allowed to perform delegated access, or you could check that the target user has an active support ticket open to defend against arbitrary user access.
- Validate the requested scopes to ensure that only the minimal set of required scopes for delegated authorization will be issued. You may wish to ensure that some sensitive operations can never be performed in the context of delegated authorization.
-
Ensure your APIs make use of the delegation context in the
actclaim of the access token. You should keep audit logs in your APIs of actions performed by a delegated actor, and ensure you can clearly audit which actor performed operations on behalf of the user. -
For auditing purposes, you can make use of the actor details in Auth0 tenant logs. Successful Custom Token Exchange transactions (
sectelog events) include theactorproperty with thesuband any nestedactorinformation.
Auth0 does not notify the end-user when a delegated authorization token is issued on their behalf. If your use case requires user notification or explicit consent before delegated access takes place, consider using Client Initiated Backchannel Authentication (CIBA) to push a consent request to the end-user’s device prior to performing the token exchange. For simpler notification needs, you can implement notification logic within your Custom Token Exchange Action, a Post-Login Action, or in your downstream services.
Use Case: Support agent accessing a web application on behalf of an end user
Sometimes a support agent needs to reproduce an issue directly in GearUp’s web application, acting as the end-user, rather than just calling GearUp’s API. Instead of exchanging tokens for an access token, the support tool requests a Session Transfer Token, which it uses to establish a delegated web session for the end-user in GearUp’s web application.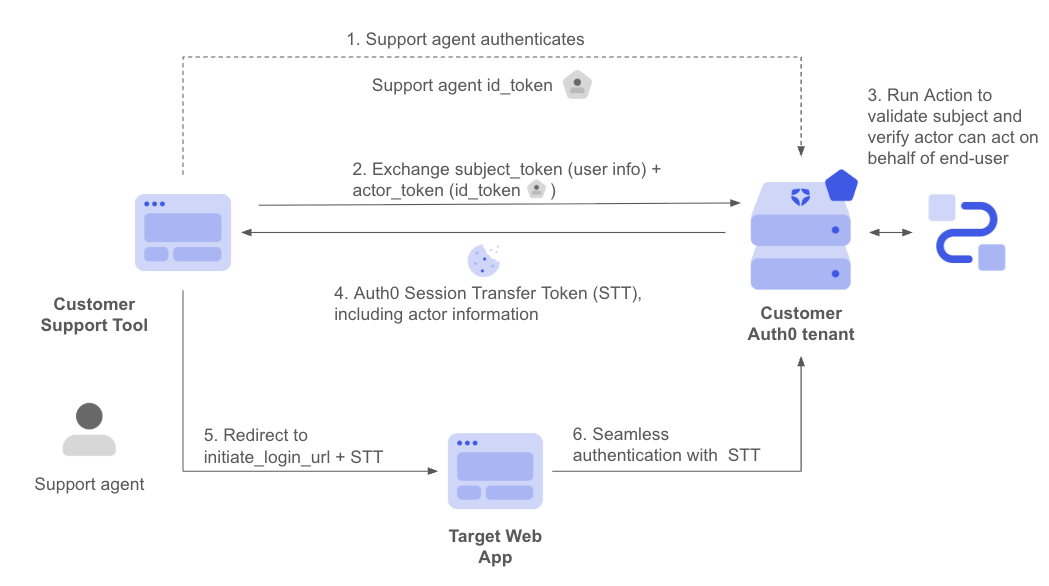
- The support tool authenticates the agent with Auth0 and obtains the agent’s ID token.
- The support tool calls Auth0’s
/oauth/tokenusing a Custom Token Exchange request, settingaudiencetourn:YOUR_AUTH0_TENANT_DOMAIN:session_transfer, with a signed JWT identifying the end-user assubject_tokenand the agent’s ID token asactor_token. - The associated Custom Token Exchange Action validates the subject token, authorizes the delegation, and calls
api.authentication.setActor()andapi.authentication.setUserByConnection()to select the connection the target application accepts. CallingsetActor()is required when requesting a Session Transfer Token; omitting it returns a400error. - Auth0 issues a Session Transfer Token (
issued_token_type: urn:auth0:params:oauth:token-type:session_transfer_token) instead of an access token. - The support tool redirects the agent’s browser to GearUp’s web application, passing the Session Transfer Token as a query parameter on GearUp’s
initiate_login_uri. - GearUp’s web application passes the Session Transfer Token through to its own call to Auth0’s
/authorizeendpoint, which validates the token and establishes an ephemeral, time-limited session for the end-user, with the agent recorded as the actor for auditing. Read Implement Session Delegation for the full request/response detail.
Your web application must explicitly opt in to accept delegated sessions, and several session behaviors differ from a regular login (session lifetime, refresh tokens, MFA, and more). Read Session Delegation to configure your web application and understand these behaviors, limitations, and how to audit delegated sessions.
audience to tell a session delegation request apart from a plain API-access request and apply a distinct authorization policy for each. Then, set the actor and the user. Auth0 decides whether to issue an access token or a Session Transfer Token based on the requested audience, not on the Action’s logic.
Important considerations for session delegation
In addition to the considerations for delegated authorization, keep in mind:- Detect it is a session delegation request based on the
session_transferaudience and apply specific authorization policy for that case. - Target application reachability depends on the specific connection your Action sets.
- To set the connection, the application calling Custom Token Exchange needs access to the same connections as your target application(s).
- Use separate Auth0 domains for the initiating and target applications to avoid an existing session on a shared domain blocking the delegated one.
- Agents must log out between delegated sessions for different users.
Code samples
The following code samples show best practices for common scenarios for validating incoming subject tokens in a secure and performant way. Use asymmetric algorithms and keys whenever you can as you don’t need to share any secret with Auth0. This also simplifies key rotation, such as when exposing a JWKS URI endpoint to advertise applicable public keys.It is your responsibility to ensure that subject tokens are protected with a strong algorithm and keys/secrets with enough entropy.
Validate JWTs signed with asymmetric keys
Consider the following recommendations:- Use Actions
api.cache ()methods to avoid having to fetch the signing keys for each transaction. - Adhere to RFC8725 best practices
- Use RS*, PS*, ES* or Ed25519 algorithms
- Do not use or accept the none algorithm
- Use RSA with a minimum length of 2048 bits.
Validate JWTs signed with symmetric keys
Consider the following recommendations:- Use Actions Secrets to securely store your symmetric secrets.
- Adhere to RFC8725 best practices
- Use secure algorithms such as HS256, along with high entropy random secrets (e.g. of at least 256 bits long)