

- Associates the account with the user as a connected account.
- Stores the external provider’s access and refresh tokens for the connected account in the Token Vault.
User authentication vs Connected Accounts
When you configure Connected Accounts for a supported social or enterprise connection, Auth0 uses the Connected Accounts flow (/me/v1/connected-accounts endpoint) to retrieve and store access and refresh tokens in the Token Vault instead of using the social or enterprise login flow (/authorize endpoint). After successfully completing the Connected Accounts flow, Auth0 adds the user account to the connected_accounts array on the user profile. In contrast, for the social or enterprise login flow, Auth0 adds the user account to the identities array on the user profile.
The following table explains the differences between the user authentication and Connected Accounts flows:
You can enable user authentication, Connected Accounts, or both for supported social or enterprise connections. The following table explains the behavior for the different Purpose settings, including how to pass scopes to the connection:
How it works
The Connected Accounts flow uses the My Account API to create and manage connected accounts for a user across supported external providers. Before the user can initiate a Connected Accounts request from the client application, the client application needs to get an access token with the Connected Accounts scopes to access the My Account API. The following sequence diagram illustrates the end-to-end Connected Accounts flow: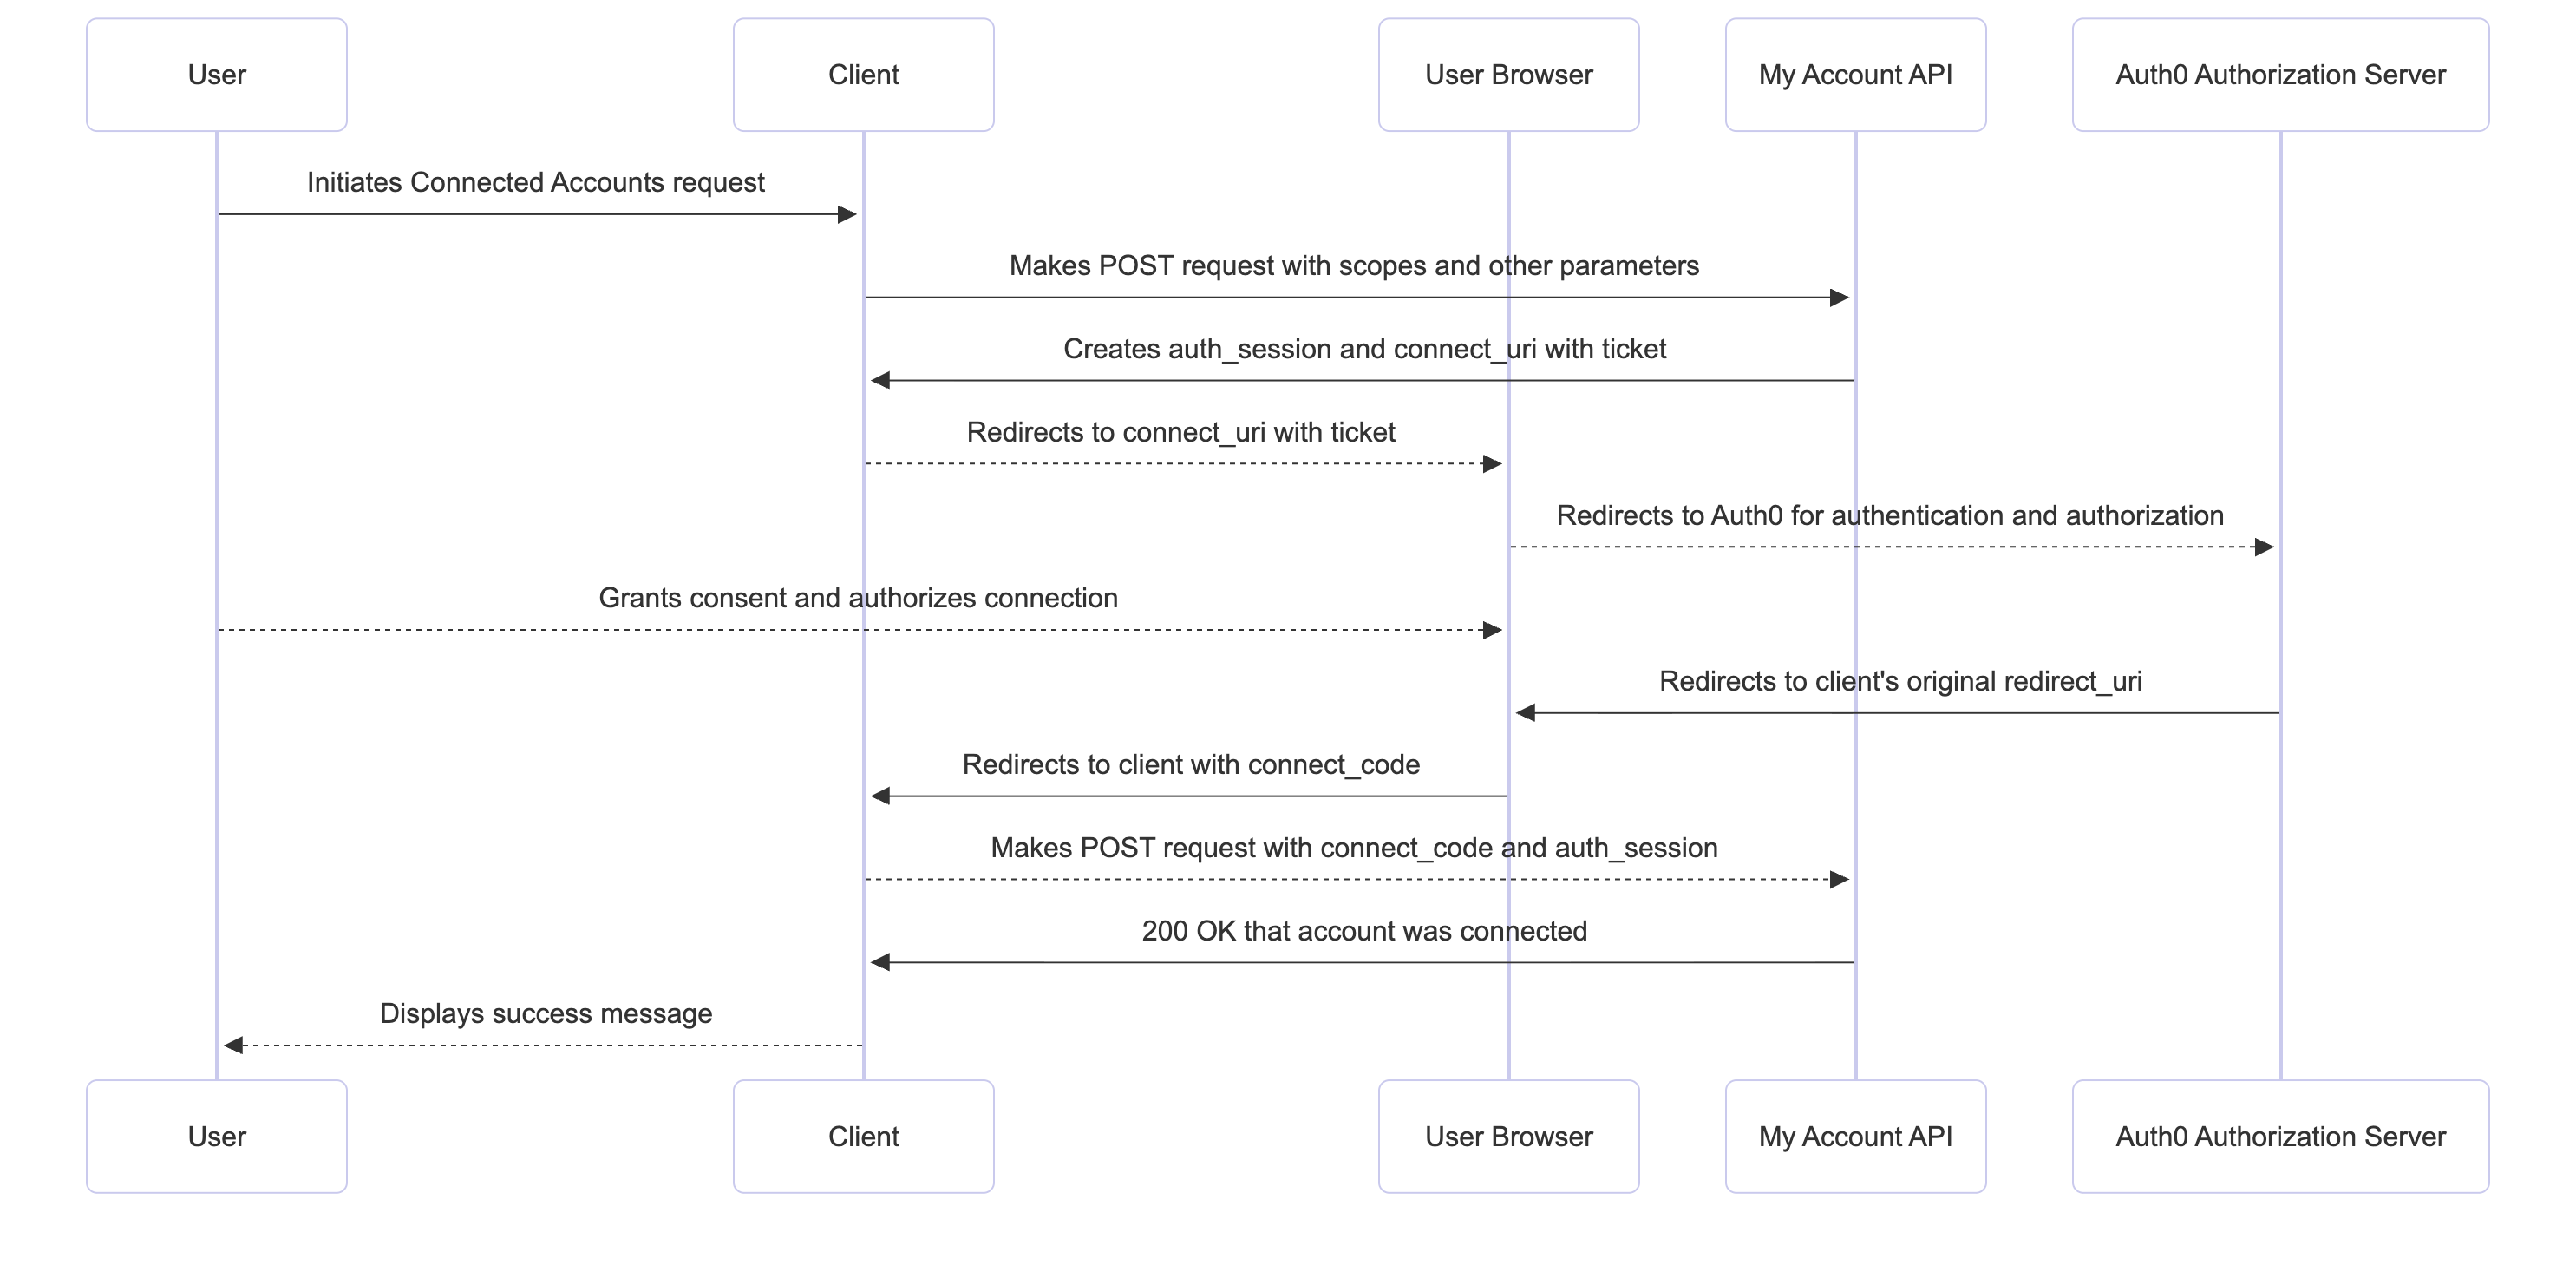
- The client application makes a
POSTrequest to the My Account API’s/me/v1/connected-accounts/connectendpoint, passing scopes and other parameters to send to the external provider. To learn more, read Initiate Connected Accounts request. - The My Account API creates a unique
auth_sessionandconnect_uricontaining aticketthat redirects the user to a web browser. The client application saves theauth_sessionfor later verification. If DPoP is configured, the My Account API validates the DPoP Proof JWT. - The client application redirects the user to the
connect_uriwith theticketas a query parameter for user authentication and authorization in the browser. The client application may also pass acode_challengeorcode_challenge_methodto the URL, as in the Authorization Code Flow with PKCE. - The user connects and authorizes the permissions for the connection in the consent screen.
- After the user successfully authorizes the connection, the external provider redirects the user to the My Account API, which redirects the user to the client application using the
redirect_uriwith a single-useconnect_code. - The client application presents the
connect_code,code_verifier(if applicable), and the originalauth_sessionto the My Account API by making aPOSTrequest to the/me/v1/connected-accounts/completeendpoint. To learn more, read Complete Connected Accounts request. - The My Account API validates the request by confirming:
- The
auth_sessionmatches the ID originally issued for the user - The request is coming from the same device that initiated the Connected Accounts flow
- The DPoP Proof JWT (if configured)
- The single-use
connect_code - The
code_verifier(if using the PKCE flow)
- The
- After successful validation, the Auth0 Authorization Server adds the account to the
connected_accountsarray on the user profile and stores the access and refresh tokens for the connected account in the Token Vault. - My Account API completes the flow by sending a
200status code back to the client application, indicating that the account was successfully connected.
Prerequisites
Before configuring Connected Accounts, make sure you:- Configure Token Vault for your client application to securely store the access and refresh tokens associated with each connected account in the Token Vault.
- Configure the My Account API, which is used by authenticated users to connect and manage accounts.
- Configure Multi-Resource Refresh Token (MRRT) to get an access token for the My Account API.
- (Optional) Configure DPoP for the My Account API and your client application to sender constrain access tokens, preventing token theft. By default, the My Account API can accept DPoP-bound access tokens.
Configure My Account API
To use Connected Accounts, configure the My Account API in the Auth0 Dashboard:- Navigate to Applications > APIs and activate the My Account API.
- Once activated, select Auth0 My Account API and then the Application Access tab.
- Find your client application and select Edit to configure its application access policies.
- Select User Access and under Authorization, select Authorized.
- For the permissions, select All the Connected Accounts scopes for the application.
- Select Save. This creates a client grant that allows your client application to access the My Account API with the Connected Accounts scopes on the user’s behalf.
- If you’re using Multi-Resource Refresh Token, navigate to the Settings tab. Under Access Settings, select Allow Skipping User Consent.
Configure Multi-Resource Refresh Token
Configure Multi-Resource Refresh Token (MRRT) to get a single long-lived refresh token that can be exchanged for new My Account API access tokens and other APIs without requiring the user to re-authenticate. You can configure MRRT with the Auth0 Dashboard or the Management API.- Auth0 Dashboard
- Management API
To configure MRRT with the Auth0 Dashboard:
- Navigate to Applications > Applications and select your application.
- Under Multi-Resource Refresh Token, select Edit Configuration.
- To enable MRRT with the My Account API, toggle on the My Account API.
Configure Connected Accounts
Before configuring Connected Accounts for a connection, make sure you’ve authorized the connection for your client application. In the Auth0 Dashboard:- Navigate to Authentication > Social Connections or Enterprise Connections and select the connection.
- Select Applications and then toggle on the connection for your client application.
- Auth0 Dashboard
- Management API
To configure Connected Accounts with the Auth0 Dashboard:
- Navigate to Authentication > Social Connections or Enterprise Connections.
- Select Create Connection or select an existing connection.
- In Purpose, toggle on Connected Accounts for Token Vault. Depending on your Purpose setting, you may need to enable
offline_accessin the Auth0 Dashboard, allowing the client application to obtain a refresh token from the external provider during the Connected Accounts flow. To learn more, read User authentication vs Connected Accounts. - Click Save.
Get access token for Connected Accounts
Before initiating a Connected Accounts request, get an access token for the My Account API with the Connected Accounts scopes. The following sections explain how to use Multi-Resource Refresh Token (MRRT) to get an access token for the My Account API.Fetch a refresh token
After configuring MRRT for the client application, initiate the authorization code flow and exchange the resulting authorization code for a refresh token. The following is an authorization code flow request for a confidential client that includes theoffline_scope to return a refresh token and a single-use authorization code for the My Account API identifier https://{yourDomain}/me/:
/token endpoint:
Exchange refresh token for My Account API access token
Once you’ve obtained a refresh token, exchange it for a My Account API access token with the Connected Accounts scopes using the refresh token grant type:Initiate Connected Accounts request
To initiate a Connected Accounts request, make aPOST request to the My Account API’s /me/v1/connected-accounts/connect endpoint with the following parameters:
For a Google social connection, make sure you select
offline_access in the Auth0 Dashboard when configuring your connection. This is required for your client application to fetch a refresh token from the Auth0 Authorization Server.connect_uri with the ticket as a query parameter. Authorize the list of scopes in the consent screen, then extract and save the connect_code in the URL fragment.
Complete Connected Accounts request
To complete a Connected Accounts request, make aPOST request to the /me/v1/connected-accounts/complete endpoint with the following parameters:
Manage Connected Accounts
To manage a user’s connected accounts, use the/me/v1/connected-accounts collection.
Before using the /connected-accounts collection, get an access token for Connected Accounts.
Query connected accounts connections
Make aGET request to the /me/v1/connected-accounts/connections endpoint to return a list of connections that are linked to the user profile:
Query connected accounts
Make aGET request to the /me/v1/connected-accounts/accounts endpoint to return a list of connected accounts linked to the user profile:
GET request to the /users/{userId}/connected-accounts endpoint:
Query connected accounts for a given connection
Make aGET request to the /me/v1/connected-accounts/accounts endpoint and pass the connection name as a query parameter to return a list of connected accounts filtered by a given connection linked to a user profile:
google-oauth2 connections:
Delete connected account
Make aDELETE request to the /me/v1/connected-accounts/accounts/{connectedAccountId} endpoint to delete a connected account for a given ID: