- Reduces the time required to set up an application instance by automating the exchange of configuration information between Okta and Auth0.
- Utilizes OAuth 2.0 consent flows for the secure and authorized sharing of sensitive configuration data, reducing potential errors related to credentials and configuration settings.
- Simplifies and standardizes the integration deployment process. Automated workflow enables consistent and repeatable deployments of application integrations across multiple customers or environments, supporting a scalable application ecosystem with less opportunity for human error.
- Eliminates the complexity of manual setup, enabling Okta customer admins to quickly add instances of Auth0-enabled OIN integrations.
How it works
The Express Configuration API allows Auth0 applications published to the OIN for customers to use Express Configuration on an Okta connection. Express Configuration supports OpenID Connect, SCIM, and Universal Logout within an Auth0 Organization. Review the Express Configuration workflow for an Auth0 app in the OIN: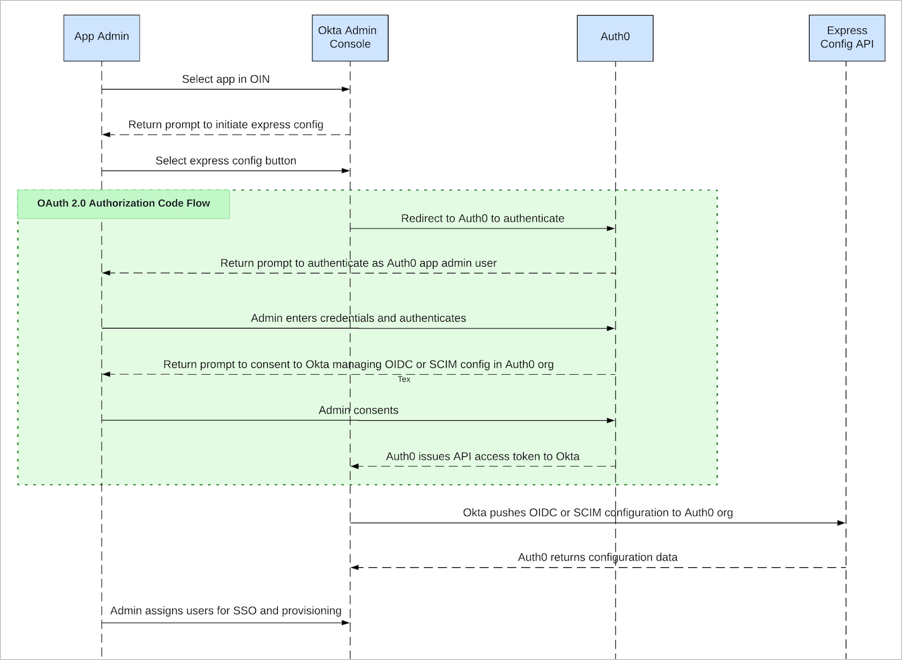
- An Okta administrator signs in to the Okta portal and selects the Express Configuration-enabled application from the OIN.
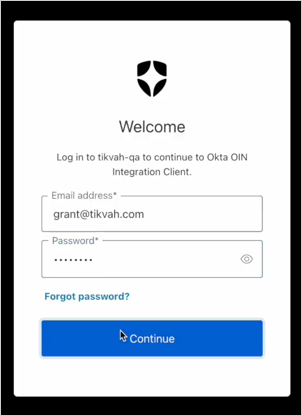
- The Okta administrator navigates to the Sign On section and select Express Configure SSO & UL. This redirects them to an Auth0 Universal Login screen.

- The Okta administrator enters the credentials of an application user who is permitted to perform Express Configuration. In Auth0, this refers to a user who is a member of an organization and is authorized to perform Express Configuration using an organizational role or other authorization method.
- After authenticating, Auth0 prompts the Okta administrator for consent.
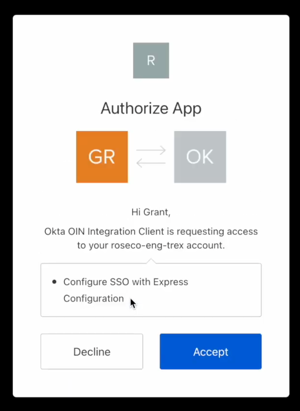
- After consenting, Okta uses the Express Configuration API to automatically configure an Okta connection within the Auth0 organization to which the Okta administrator belongs.
- The Okta administrator may then assign users to the application instance and see single sign-on working immediately.
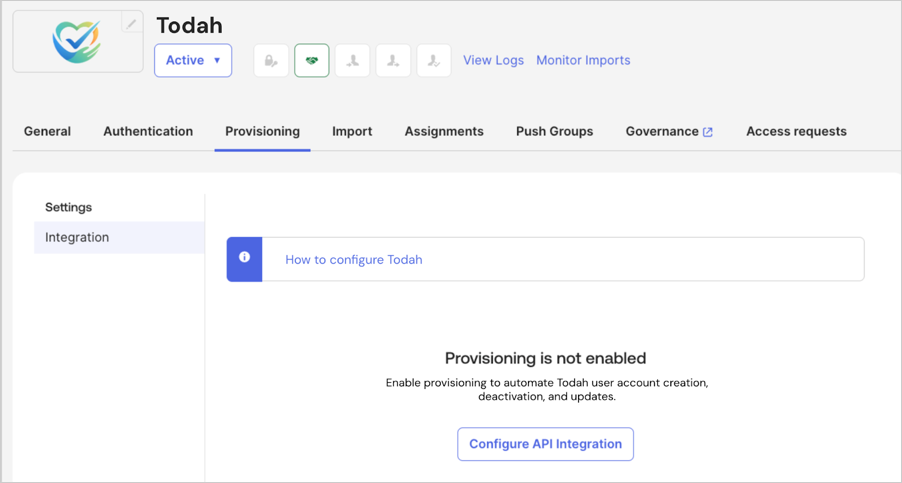
- When SCIM is enabled, Okta administrators can configure SCIM by navigating to the Provisioning section of the application details and selecting Express Configure SCIM.
- When Universal Logout is enabled, it will be automatically configured as part of the OpenID Connect integration.
Prerequisites
To publish an application to the OIN with Express Configuration enabled, you must have the following:- An Okta Integrator Free Plan org, with access to either the Super Admin role or the App and Org Admin roles.
- An Auth0 subscription that enables the use of the Okta connection type and the Organizations feature for as many customers as you need.
- A SaaS application that has been integrated with Auth0 using a Multi-Organization Architecture.
- This includes registering your application as a Regular Web Application or Single-Page Application in Auth0, and enabling each of your customers to sign into that application using their own distinct identity providers.
- An Auth0 Organization is deployed, or can be deployed, for each customer using Express Configuration. Organizations and organizational roles are used to authorize specific users to perform express configuration and create Okta connections only within the organizations to which they belong.
- Your Auth0 tenant should have the Enable Application Connections tenant setting disabled.
Tip: To view a sample application that implements a multi-tenant architecture including Auth0 Organizations and organizational roles, refer to the SaaStart reference application.
Configure your application for Express Configuration
The Auth0 Dashboard guides an Auth0 developer through enabling Express Configuration for their application and publishing it to the OIN. An Auth0 Admin role in a production Auth0 tenant is required to complete the end-to-end setup and publishing process.
- A registered application with Initiate Login URI Template
- A Connection Profile (CP)
- A User Attribute Profile
- Organization login settings
- Administrator login and consent settings
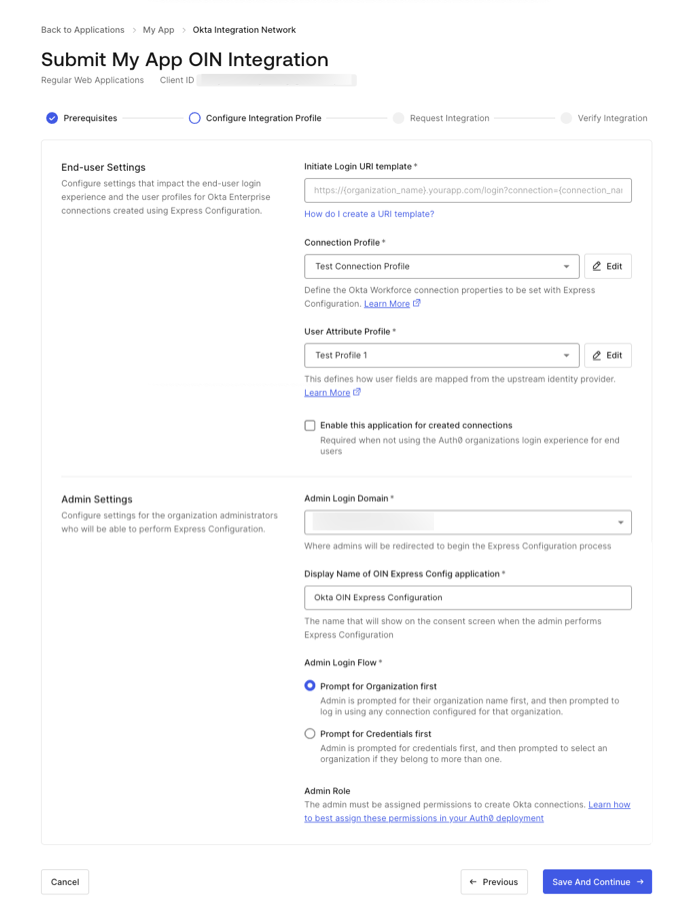
Register an application with Initiate Login URI Template
- Register your application as a Regular Web Application or Single-Page Application in Auth0 Dashboard.
- Once registered, select the application you created and navigate to the Okta Integration Network tab to begin the Express Configuration setup wizard.
- Select Get Started.
- Review the Prerequisites and select Continue.
- Register an Initiate Login URI Template. This template implements an endpoint on your application to automatically redirect end-users to Auth0’s
/authorizeendpoint for authentication. To review an example of a login endpoint, review the/loginroute in the Express SDK Quickstart.- After Express Configuration initiates for an application instance, Okta uses the Initiate Login URI Template to launch the application from the end-user dashboard.
- (Optional) Set the
organization_name,organization_id,andconnection_namefor Auth0’s/authorizeendpoint to identify the organization or connection to use. Okta dynamically replaces these variables when the URL is launched from the end-user dashboard. Example:https://{organization_name}.your-app.com?connection={connection_name}.
https://your-app.com/login https://your-app.com/login?connection={connection_name} https://{organization_name}.your-app.com?connection={connection_name} Connection Profile
In the Initiate Login URI Template, you have the option to add a Connection Profile. The Connection Profile enables Auth0 to specify how the private settings of your connections should be configured when created using Express Configuration, including settings that govern how the connection interacts with Auth0’s Universal Login and Organizations features:- Options for how the connection name should be created in Auth0
- Options to use SCIM and/or Universal Logout with the connection (Recommended)
- Options to allow end users of the connection to automatically become members of the consenting administrator’s organization
- Options for the Show as button setting for the connection on Auth0’s Universal Login page
User Attribute Profile
In the Initiate Login URI Template, you have the option to add a User Attribute Profile. The User Attribute Profile (UAP) allows Auth0 developers to define, manage, and map user attributes consistently across the various protocols supported by Auth0. When used with Express Configuration, the User Attribute Profile allows developers to customize the OpenID Connect and SCIM attribute maps that will be written to the Okta connection generated by Express Configuration. If you do not have a User Attribute Profile configured, Auth0 provides a default User Attribute Profile with common and recommended mappings for all protocols, including OpenID Connect and SCIM, which are used by the Okta connection type. To learn how to customize the default UAP, read User Attribute Profile.Organization login settings
Auth0 Organizations is required to authorize specific organizational users to create isolated connections but is not required to change your application’s existing login flow to support the organization-based login flow for business users.- If your application currently uses an Identifier-First login experience and home realm discovery with your applications, see the Enabling Home Realm Discovery section for information on how to enable home realm discovery.
- If you wish to enable multiple applications in
enabled_clientsto be used with your Express Configuration connections, see Enabling Multiple Auth0 Applications Under a Single Integration.
enabled_clients setting on the connection.
Administrator login and consent settings
When Express Configuration is enabled, Auth0 creates an additional client application ID that is used by the OIN during the administrator consent flow between Okta and Auth0. Okta creates one OIN client for each distinct application integration published to the OIN. Configure administrator login and consent settings in the application you want to publish to the OIN under Configure Integration Profile.- Navigate to Auth0 Dashboard > Applications.
- Choose the application you want to publish to the OIN.
- Select Okta Integration Network.
- Verify you have the necessary prerequisites and select Continue.
- In the Configure Integration Profile section, configure options in Admin Settings.
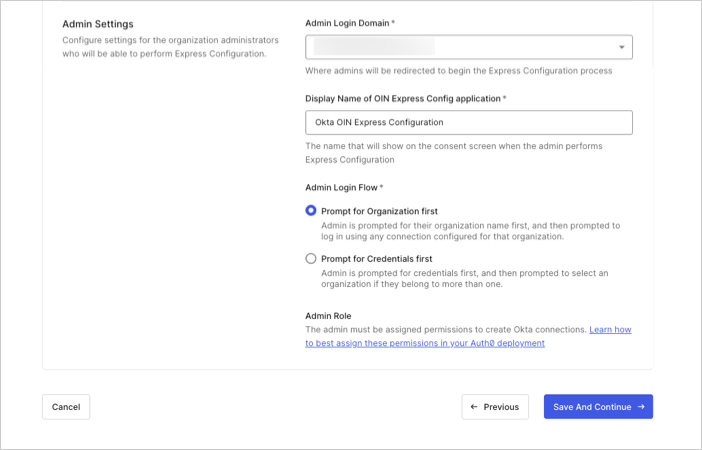
- Admin Login Domain: Auth0 tenant domain Okta redirects to as part of the consent flow in a Web browser. Use the custom domain name if you have one configured in Auth0. To learn more, read Custom Domains.
- Display Name of the OIN Express Configuration Application: Name of the OIN client application shown in the consent dialog.
-
Admin Login Flow: Defines the Organization login flow for the OIN client application and used when an Okta administrator runs Express Configuration from the Okta console. Select from:
- Prompt for Organization: Admins are first asked to select their Organization and are presented with the login experience for their Auth0 Organization. Admins can sign in using a pre-existing connection configured in that organization.
- Prompt for Credentials: Admins are first asked to provide their login credentials. When this option is selected, a button will appear that allows you to select the connections that contain the admin users. This can be a shared database connection, a passwordless email connection, or another connection that can be associated with all Auth0 Organizations.
- Admin Role: In order to perform Express Configuration, the admin must be assigned the appropriate permissions. Read Assign express configuration permissions to users for instructions on how to authorize admins in the way that makes the most sense for your current Auth0 deployment.
For the best consent experience, set your tenant’s
use_scope_descriptions_for_consent flag to true as described in Customize Consent Prompts. You will have the opportunity to view your consent prompt later in when you test and verify your integration.Assign permissions to users
For Okta, administrators must have an application user account with required permissions to perform Express Configuration for an Auth0-powered SaaS application. For Auth0, any application user may be granted this permission, as long as the user is a member of an Auth0 Organization where the Express-configured connections is created, including:- A user in a dedicated database connection that has been created exclusively for a single Organization
- A user in a shared database connection who is a member of one or more Organizations
- A user with a passwordless email connection who is a member of one or more Organizations
- A user in a social or existing enterprise connection who is a member of one or more Organizations
For tips on provisioning administator accounts to use Express Configuration, read Customer Enablement.
Assign permissions to a pre-existing application user role
Use this method of assigning Express Configuration permissions if you use Auth0’s RBAC feature for application roles and API permissions and already have one or more roles that represent an administrative user that would be assigned to an IT administrator deploying the application. Required API permissions:
To learn more about assigning roles in Auth0 Dashboard and Management API, read Add permissions to roles.
Assign a new role to application users
Use this method of assigning Express Configuration permissions if you use Auth0’s RBAC feature for application roles and API permissions, but do not have a role that represents an administrative user, such as an IT administrator, who would be assigned to deploy the application. This method is also suitable for Auth0 developers who aren’t currently using Auth0’s RBAC feature but want to utilize it to gain granular control over which users are allowed access, using either the Auth0 Dashboard or the Management API.Create a role
Use Auth0 Dashboard, Management API, or Auth0 CLI to create roles. This example uses Auth0 CLI:Assign permissions to the role
Assign theexpress_configuration:sso and express_configuration:scim permissions to the specified role. Replace $ROLE_ID with the role ID that you want to grant permission.
When using this method, you will need to update your customer onboarding process to assign this role to any new organizational users who require Express Configuration permissions.
Assign permissions based on user attributes using a post-login Action
Use this method of assigning Express Configuration permissions if you are using an Auth0 post-login Action to dynamically assign permissions based on user attributes instead of Role-Based Access Control (RBAC), Management API, or Auth0 Dashboard to assign user roles. This is appropriate for Auth0 customers who have deployed Auth0 using an attribute-based authorization model using custom permissions in Auth0 metadata. ExampleThe following example uses a post-login Action to assign permissions based on the value of an existing custom user attribute,
user.app_metadata.is_admin.
Enable home realm discovery
Before you run Express Configuration, you must collect and verify customer email addresses as part of the customer onboarding process to enable HRD.
- One or more email domains can be stored in organization metadata on the customer’s Auth0 Organization.
- Your post-login action can make an API call to retrieve verified domains from any system in your environment that stores them.
In this example, verified domains are stored in connection metadata in the Auth0 Organization, which requires a comma-delimited string of one or more email domains stored in the organization metadata under a key named
domains.
Example values: test.com,test2.com
In this example, the post-login Action makes an API call to retrieve verified domains from a storage system in your environment.
Maintain admin account matching across connections
Auth0 permits provisioning user accounts with the same email address in different connections. An end user can have a database connection, social, or passwordless account with their work email address, and also have the same email address in their federated Okta account. When using the Prompt for Credentials option in the Admin login and consent flow, home realm discovery starts matching users with a specific domain suffix to the new Okta connection instead of other connection types after it is added to the Organization. To learn more about this Organization login behavior, read Identifier First Authentication with prompt for credentials. This behavior only takes effect when customers run Express Configuration a second time after their initial Auth0 admin user session expires. If the admin account identifier is an email address that matches the new Okta connection, the admin will be redirected there. This behavior can be managed or avoided using any of the following methods:- Use the Prompt for Organization option in the Admin login and consent flow.
- Enable Express Configuration permissions for the new Okta account that contains the matching verified email address after it is provisioned.
- If you only use Auth0 Organizations for the Express Configuration admin consent flow and not your application experience, you can solve the issue by disabling the
enable_organizationproperty described in Configure SaaS Application Properties. - This is not an issue if the admin user identifier is not an email address, such as a username in a database connection.
Enable multiple applications under a single integration
If you want end-users of a single Express Configuration on an Okta connection to access multiple applications in your tenant, you can set alinked_clients property on your registered web application.
To modify this setting, use the Auth0 Management API to retrieve your registered web application. Replace {yourAppId} with the Client ID of your registered application, and {yourAccessToken} with a Management APIv2 access token. To learn how to get an access token to use the Management API, read Management API Access Tokens.
express_configuration property from the response, add an array of additional application IDs to a linked_clients property, and update your registered web application:
enabled_clients property of the Okta connection.
Publish your integration to the OIN
After you create a base configuration, you are ready to start the submission process to the OIN. As part of this process, you will be able to fully test Express Configuration end-to-end prior to going live:- Register your application in the OIN
- Add Express Configuration to your OIN integration
- Configure your OIN public key
- Test and verify your Express Configuration integration
- Finalize your OIN submission
Register your application in the OIN
OIN requirements
To add Express Configuration to a new or pre-existing application in the OIN, you need:
- An instance of your Auth0-enabled web application to use for testing
- An Okta Integrator Free Plan org, with access to either the Super Admin role or the App and Org Admin roles.
- Your Okta Integrator Free Plan org must be configured as an Okta connection in your Auth0 tenant and enabled for use with your Auth0-enabled web application in order to complete basic tests
- Google Chrome browser with the Okta Browser Plugin installed (review OIN Wizard requirements)
- Sign in to your Okta Integrator Free Plan org with the user account you used to sign up with, or with an account that has been assigned the
SUPER_ADMINrole, or theAPP_ADMINandORG_ADMINadmin roles in Okta. - Navigate to Applications > Your OIN Integrations in the Admin Console.
- If this is a new application, select Build new OIN integration. Otherwise, select your existing OIN Integration. The OIN Wizard appears:
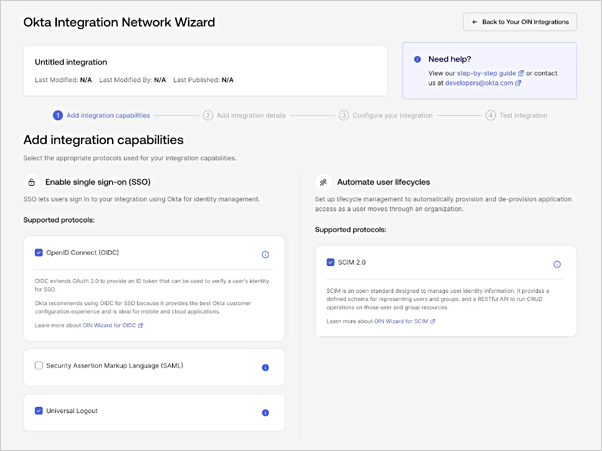
- Under Add integration capabilities, select OpenID Connect (OIDC) as the SSO protocol.
- You may optionally select Universal Logout and SCIM 2.0, both of which are highly recommended for all Okta integrations and supported with Express Configuration.
- Select Add integration details.
- Complete the OIN Catalog Properties section as desired. For reference, read OIN Catalog Properties.
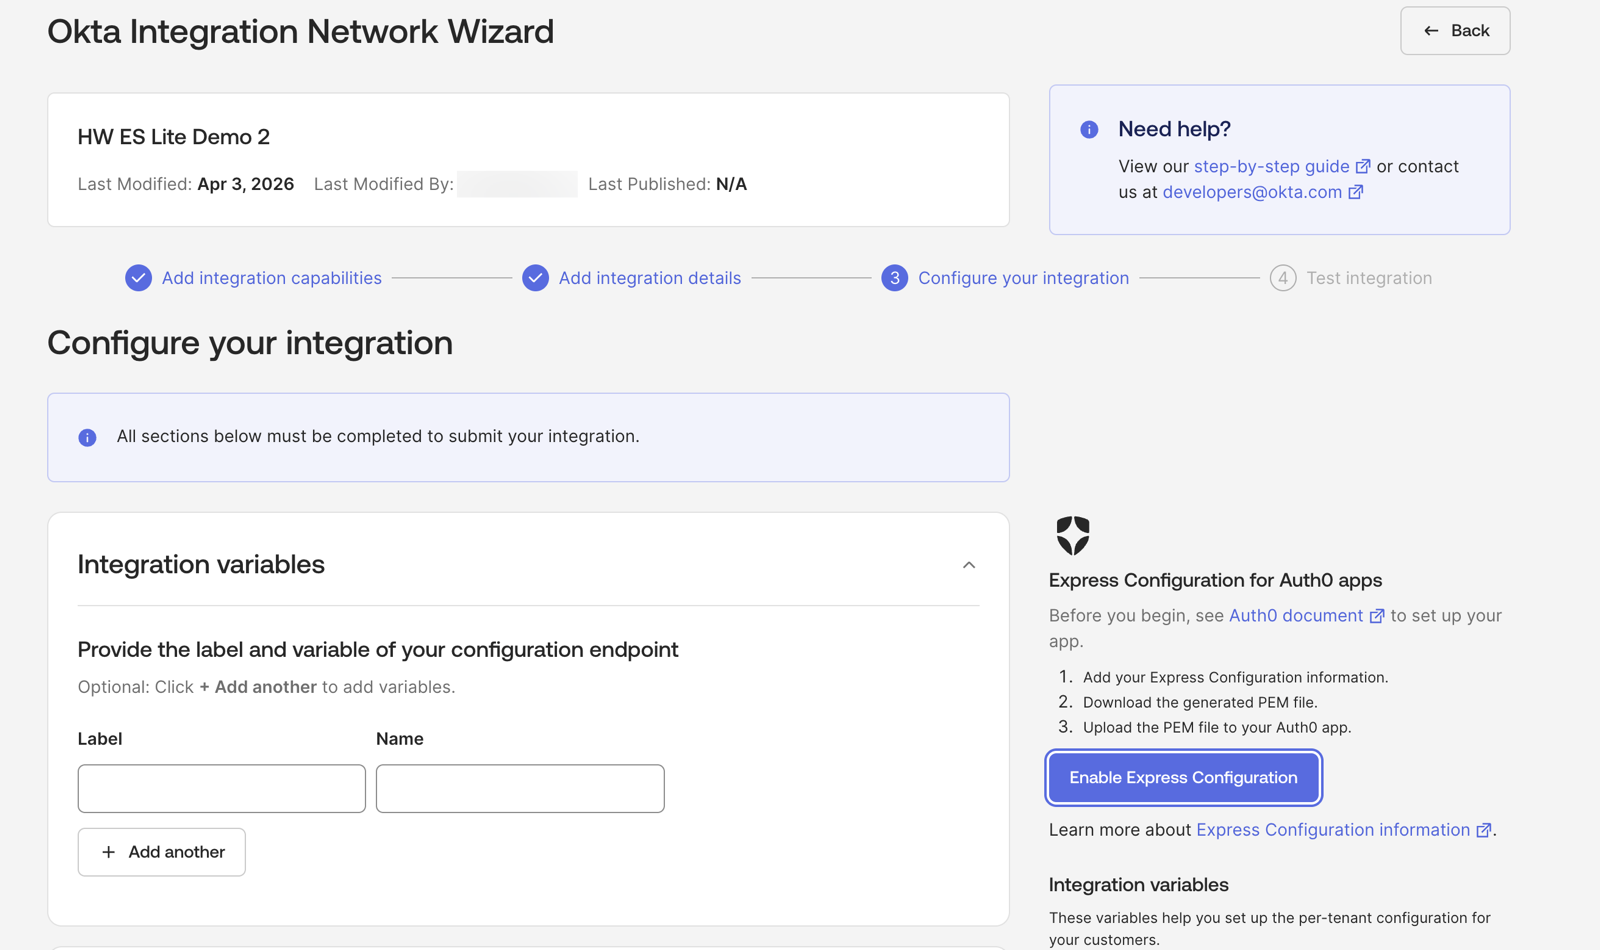
- Select Configure your integration. You enable Express Configuration for your application on this screen.
Add Express Configuration to your OIN integration
To enable Express Configuration capabilities for your registered OIN Integration:- On the Configure your integration screen of the OIN Wizard, select Enable Express Configuration. This shows a window asking for information you retrieve from your Auth0 tenant.
- In a new browser window, navigate to the Auth0 Dashboard > Applications > [Application] > Okta Integration Network > Create OIN Integration and copy the information indicated on the screen.
- Return to the Configure your integration screen of the OIN Wizard, and paste the information into the Express Configuration Information field.
- Select Continue.
Configure your OIN public key
Next, follow the prompt to download a public key file from Okta you need to upload to Auth0.- In the Express Configuration for Auth0 apps window of the OIN Wizard, choose Download Key (.pem) to save the key to your local device.
- Upload the file to Auth0 Dashboard > Applications > [Application] > Okta Integration Network > Create OIN Integration.

- Select Save.
- Return to the Configure your integration screen of the Okta portal, and choose Finish. This automatically populates many of the required configuration fields for your integration.
Complete your integration configuration
-
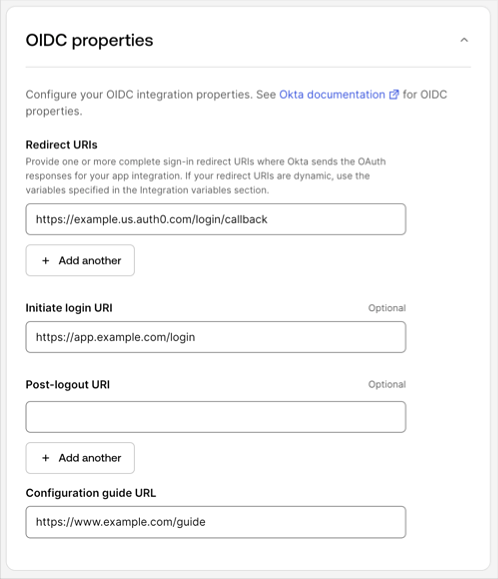
Under OIDC Properties, set the following fields:
- Redirect URIs should be automatically set to the callback URI for your Auth0 tenant. This can use your tenant’s custom domain or your
auth0.comdomain. Example:https://tenant.auth0.com/login/callback - Initiate Login URI should be automatically set to the value you configured for your application in Auth0, as described in Register an application with Initiate Login URI Template.. Okta will use this URL to launch your application from the end-user dashboard. Note that the variable names have been modified to correspond to the integration variables shown on this screen.
- (Optional). Set Post-Logout URL to the sign-out redirect URIs for your app. This is the location where you want to send your end user after they sign out of your app. You can use integration variables if your sign-out URI varies per tenant.
- Set Configuration guide URL to link to your customer-facing instructions on how to configure SSO between Okta and your app with Express Configuration. To learn more, read Customer configuration document guidelines.
- Redirect URIs should be automatically set to the callback URI for your Auth0 tenant. This can use your tenant’s custom domain or your
-
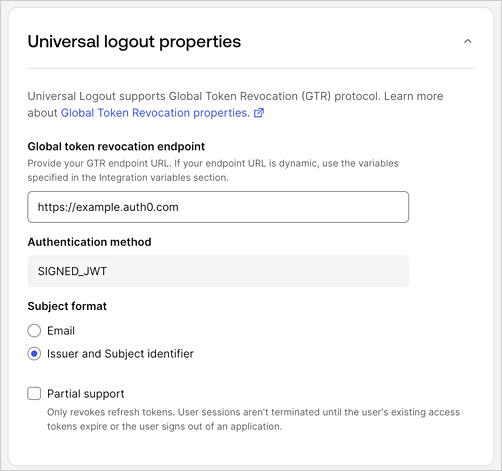
If Universal Logout is selected, confirm the following values are set under Universal logout properties:
- The Global token revocation endpoint should be automatically set. This value will be dynamically replaced when Express Configuration runs.
- The Subject format should be automatically set to Issuer and Subject identifier.
- Check Partial support if you do not use OIDC back-channel logout between Auth0 and your application but your application uses refresh tokens.
-
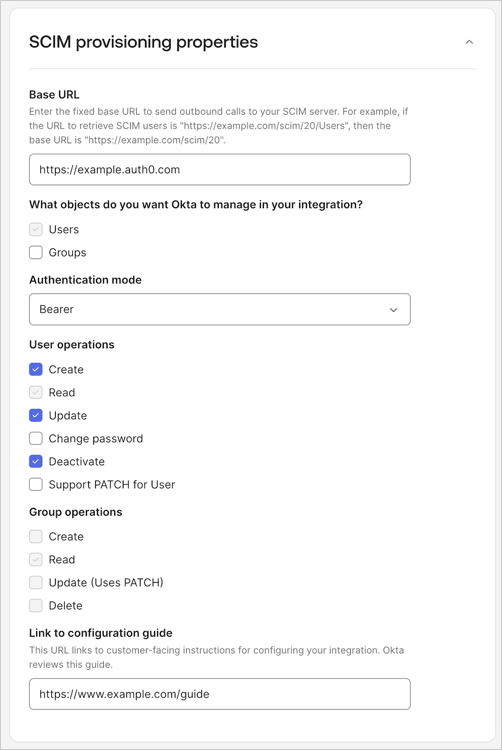
If SCIM 2.0 is selected, confirm the following values are set under SCIM provisioning properties:
- The Base URL should be set to an integration variable. This value will be dynamically replaced when Express Configuration runs.
- The User Operations should be automatically set to Create, Read, Update, and Deactivate.
- Set the link to your customer-facing instructions on how to configure SSO between Okta and your app with Express Configuration. Read Customer configuration document guidelines.
- Select Get started with testing.
Test and verify your integration
After you upload the public key to Auth0, you can test Express Configuration using your Okta Free Integrator organization:- Create an Auth0 Organization and username/password account you can share with the Okta OIN Operations team.
- Follow the instructions in the Example customer enablement flow to create an Auth0 Organization and username/password account for this purpose.
- If needed, perform additional work required in your application to allow the test Organization to log in, such as creating a new application tenant.
- Once you create a test account, sign in to your Okta Integrator Free organization as a user with either the super admin (
SUPER_ADMIN) role, or the app (APP_ADMIN) and organization (ORG_ADMIN) admin roles. - Navigate to Applications > Your OIN Integrations in the Okta admin console. Select the name of your OIN integration.
- Choose Configure your integration. Then choose Get started with testing.
- Set Account URL to the login page of your application. An Okta OIN operations engineer navigates to this URL and use the account credentials you provide in the subsequent fields to sign in to your app.
- Set Username and Password to be the username and password of a test Organization administrator account you configured for testing Express Configuration.
- Set Support Contact to be the email for Okta to contact your company about your integration. This email isn’t exposed in the OIN catalog or to your customers. It is only visible to the internal Okta team.
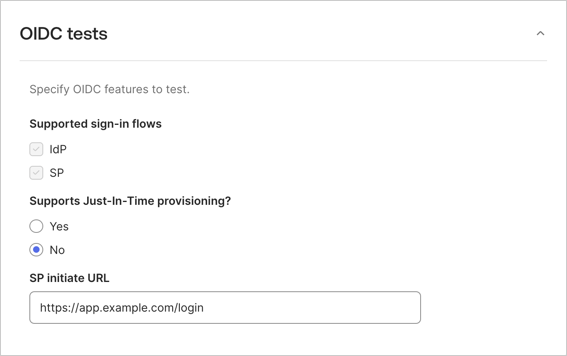
- Under OIDC Tests, select No for Just-In Time Provisioning to skip this test, and set SP Initiate URL to the initiate login URL of your application instance.
- Select Test your integration.
- Select Generate Instance, then Done.
- Navigate to the Sign On tab.
- To test Express Configuration of Single Sign-On and Universal Logout and select Express Configure SSO & UL.
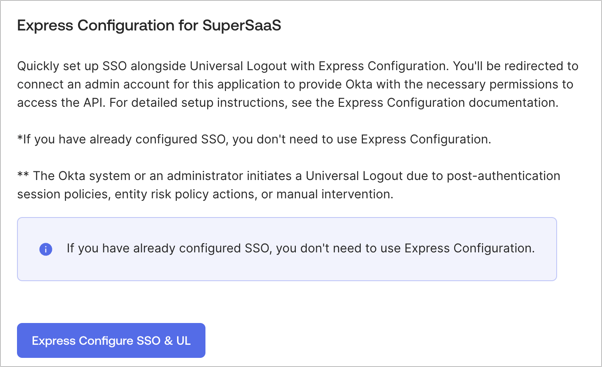
- Once you are redirected to Auth0’s Universal Login page, sign in with your Organization admin account and consent to data sharing.
- To test SCIM: select Provisioning, and then Express Configure SCIM. When redirected to Auth0’s Universal Login, continue through the consent prompt. Once complete, the SCIM integration is configured.
- Next, select the Assignments tab and assign a user from your Okta Free Integrator organization for which you have credemtials. If a suitable user doesn’t exist, then follow instructions to Add users manually. If SCIM is enabled, the user should be provisioned to your Auth0 tenant. Confirm using the Auth0 Dashboard.
- To test SSO: Use the user account you just assigned and the test instance. Log in with the user account credential.
- To test Universal Logout: follow the instructions on Test Universal Logout.
Finalize your submission
Basic testing is complete with the previous section. To finalize your submission, your configuration must pass some automated tests:- On your application instance, select Begin Testing to finalize your submission.
- Next to the name of the instance you just tested with Express Configuration, select Add to Tester.
- To complete the automated SSO tests, select Run test for the IDP flow and/or SP flow tests. These tests require the Okta Browser Plugin. To learn more, read OIN Wizard Requirements.
- Sign in with the Okta Free Integration Organization user you assigned to the application instance. The tests passes as soon as the plugin detects you are able to successfully sign in to your application. For more information on these tests, read Test your integration.
- If you receive the error message
invalid_request (no connections enabled for the client)during the login test, wait a few minutes and then try again. Newly-created connections can take a few minutes to work with features like HRD.
- To complete the required Runscope testing for SCIM, follow the instructions on Test your SCIM API using Okta SCIM 2.0 Spec Tests.
- For a second SCIM token, use the Authentication > Enterprise > Okta > [your-express-configred-connection] > Provisioning > Sync user profiles using SCIM > Setup section.
- Once complete, enter the shareable Runscope test URL in the Link to Runscope spec test results and Link to Runscope CRUD test results fields in the OIN Wizard.
- When complete, select Submit Integration.
Customer enablement
When your application publishes in the OIN, you can update your product documentation to indicate you support Express Configuration with Okta. Your product documentation should indicate the user roles or user types have permission to perform Express Configuration. If your application already utilizes Auth0 Organizations with Organization administrator roles as exemplified in the SaaStart reference application, you can add the Express Configuration permissions to that role. If you have not yet deployed Auth0 Organizations for your customers, or don’t implement administrative users in your application, refer to the example customer onboarding flow.Example customer enablement flow
In your customer onboarding process, you should collect:- The name of the customer’s organization
- Email address of the customer administator who should have permissions to perform Express Configuration
- Verfied email domains the customer’s IdP issues for users, including the domains for the administrator
- Create an Auth0 Organization
- Create the admin user account in an Auth0 connection, such as database or email passwordless.
- Associate the connection with the Auth0 Organization. Disable Membership On Authentication.
- Add the admin user account as a member of the Auth0 Organization.
- Assign an organizational role to the admin user with permissions to perform Express Configuration.
Auth0 CLI example
Initialize Auth0 CLI and authenticate Authenticate with Auth0 with Auth0 CLI.org_id.
Create the Organization admin account
In this example, you create a user in an email passwordless connection, requiring the email connection type. The command requires inputting the email address of the user you authorize to perform Express Configuration.
Tip
If you are creating this Organization to provide a username and password test account to the Okta OIN operations team, create the test account in either a shared or dedicated database connection:
user_id.
Associate the connection with the Organization
Retrieve the connection ID:
org_id.
org_id and user_id.
user_id and org_id.
Recommendations to provision admin accounts
Whether you are using existing user accounts or deploying new ones to enable Express Configuration, follow the recommendations below.Use work email
Whether the non-federated admin account is a database, passwordless email, or social user account, it is best to have the value of theemail attribute match the user’s work email address that will be provisioned with their Okta Enterprise user account (example: john@mycompany.com).
Auth0 also recommends to verify these email addresses using an email verification flow.
Use multi-factor authentication
You can add an additional layer of security to the Express Configuration flow by requiring multi-factor authentication at each login. The example Post-Login Action demonstrates how you can conditionally challenge for factors like WebAuthN with device biometrics and one-time password delivered over email each time Express Configuration runs. The example Action requires enabling these factors in your Auth0 tenant and selecting the Customize MFA Factors using Actions option.Monitor Express Configuration usage
Express Configuration usage can be observed in the Auth0 tenant logs by filtering on the OIN Client ID for each application you have configured. This includes all admin user login activity, as well as all API operations to create and manage the Okta Enterprise connections. The OIN Client ID for your application can be viewed in these places:- In the Applications > [Application] > Okta Integration Network > Create OIN Integration section of the Auth0 Dashboard.
-
In the
express_configuration.okta_oin_client_idproperty of your application when viewed in the Auth0 Management API.
Limitations
- Only one Auth0 tenant can be used in a single OIN integration. If the same application is deployed in multiple Auth0 regions, each region requires its own OIN integration
- One OIN integration in one Okta organization can create one unique Okta connection in one corresponding Auth0 organization. Express configuration is not supported for more than one instance of an OIN application within an Okta organization
- Each unique integration listed in the OIN creates an independent Okta connection. If you have multiple applications that require an Identifier-First login experience with home realm discovery, we recommend publishing multiple applications under a single integration.
- When enabling multiple applications under a single integration, Okta only shows the main OIN application in its end-user dashboard.
Management API reference
To use Management API instead of Auth0 Dashboard to enable Express Configuration for a given application, use the examples below.Create the Okta OIN Express Configuration System API
Registers the resource server which will be used to authenticate Organization Admins. This is only required if the dashboard was never used to set up Express Configuration for apps in a tenant. Example:Create User Attribute Profile
Creates a User Attribute Profile. This step is only required if there are no existing profiles, or the developer wishes to use a custom profile. To start from a set of defaults for the User Attribute profile, call theGET /api/v2/user-attribute-profiles/templates endpoint first and use the response in the body of the call to create the User Attribute Profile.
Example:
Create Connection Profile
Create a Connection Profile. This step is only required if there are no existing profiles or the developer wants to use a custom profile. To start from a set of defaults for the Connection profile, call theGET /api/v2/connection-profiles/templates endpoint and use the response in the body of the call to create the Connection Profile.
Example:
Create OIN Express Configuration Client
Create the service application that Okta will use during Express Configuration for a given application. This client must be created with the properties shown in the example below. Theorganization_require_behavior attribute may be customized with one of the values below, which are also explained in Administrator login and consent settings.
pre_login_prompt: Prompts for the admin’s organization prior to prompting for credentials.post_login_prompt: Prompts for the admin’s credentials. For this option, use thePATCH /api/v2/connections/{id}endpoint to add the Client ID of the OIN client to theenabled_clientsproperty of the connection(s) containing the admin accounts.
Configure SaaS application properties
Set the configuration values for theexpress_configuration property on the registered application that will be published to the OIN. Replace the values in the examples with a valid Connection Profile ID, User Attribute Profile ID, OIN client application ID, initiate login URI, and Auth0 tenant domain to use for this integration.
The linked_clients attribute corresponds to the setting described in Enable multiple applications under a single integration.
The enable_client attribute corresponds to the setting for enabled_clients described in Organization login settings.
The enable_organization attribute should normally be set to true, unless you aren’t assigning created connections to their organizations. The Okta app instance can still manage the connection, but Okta users will not become members of the Auth0 Organization. Setting this to false can be useful in the case described in Maintain admin account matching across connections.
Example:
Upload Public Key
Upload the public key provided by the Okta team as a credential of the OIN client application. Example:Assign keys to OIN client application
Assign the uploaded public keys from Okta to the OIN service client. ReplaceyourCredentialId with the credential ID received in the previous step.
Example: